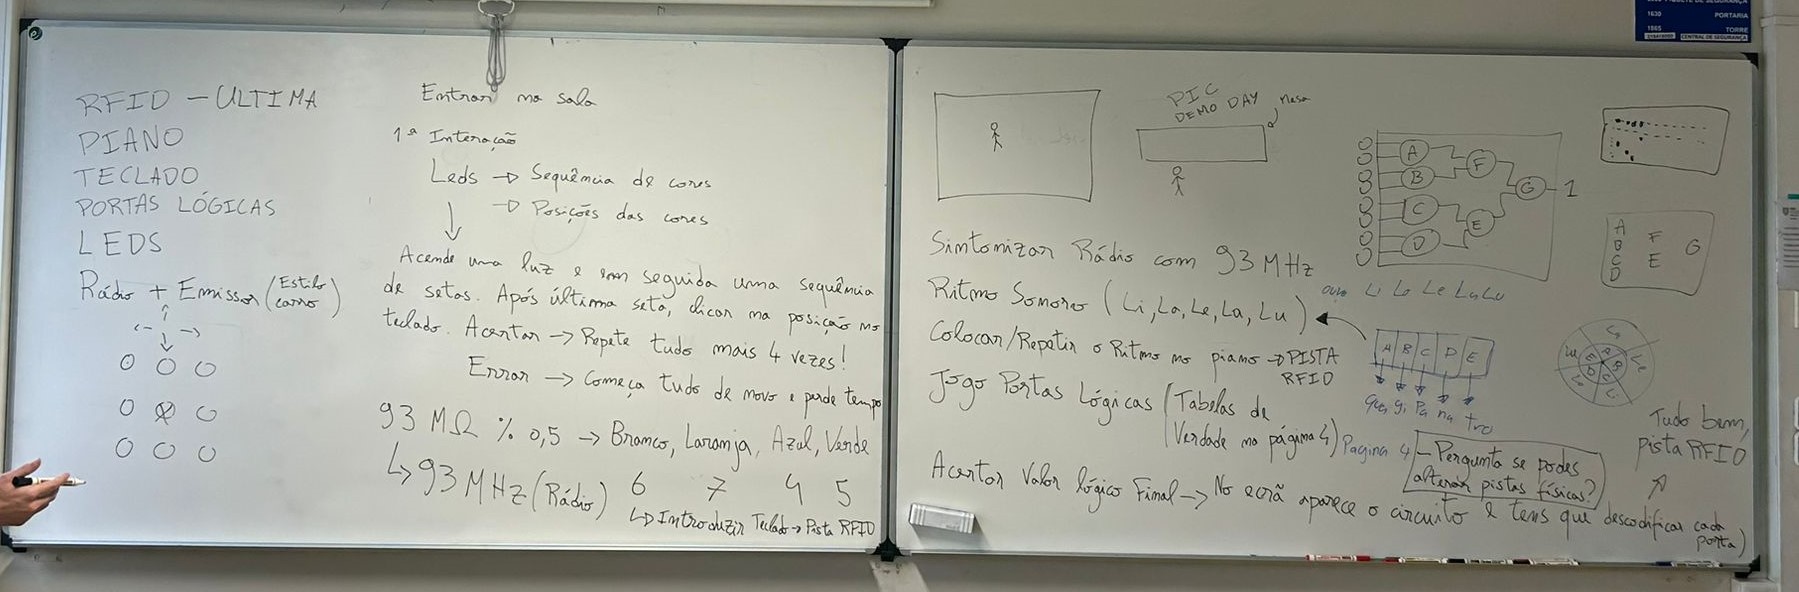
This week, we sent the final prototype of the keypad to be printed on the 3D printer at ROB 9-16 in
TagusPark. However, the printer malfunctioned midway through the process, so we will need to reprint
the entire prototype.
The hardware lead planned some final circuits and the electrical schematic for the radio.[Gonçalo Firme]
The design manager built the prototype of the LED game in cardboard and made some adjustments to the
3D models.[Gil Jardim]
The builder manager created the vector file to use on the acrylic laser cutting machine.[Tiago Nóbrega]
The software lead finalized the NODE-RED interface.[Gonçalo Baião]
The team leader continued writing the escape room story.[Rafael Santos]
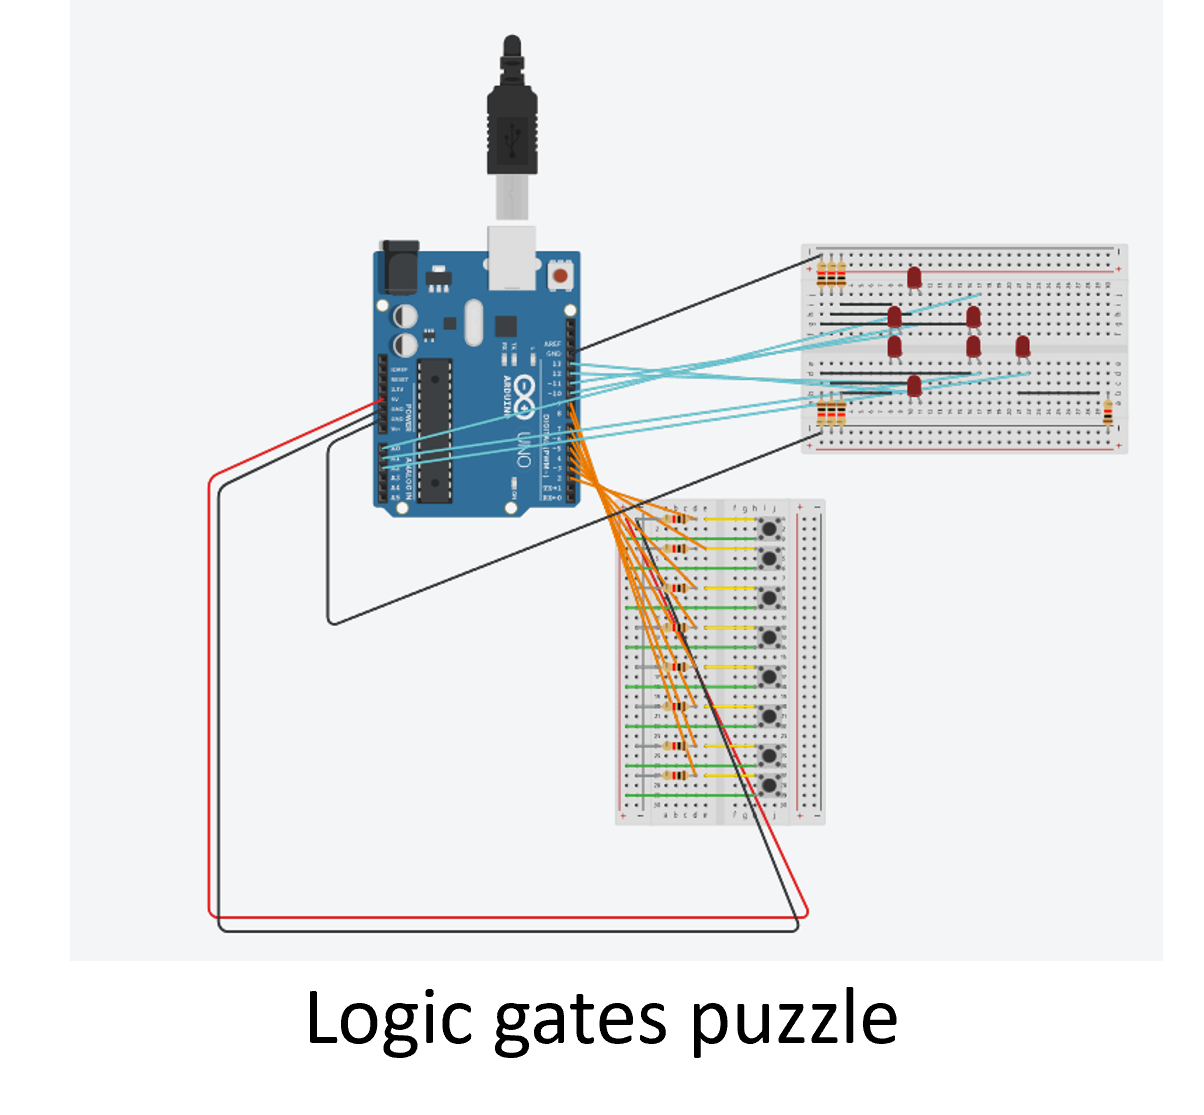
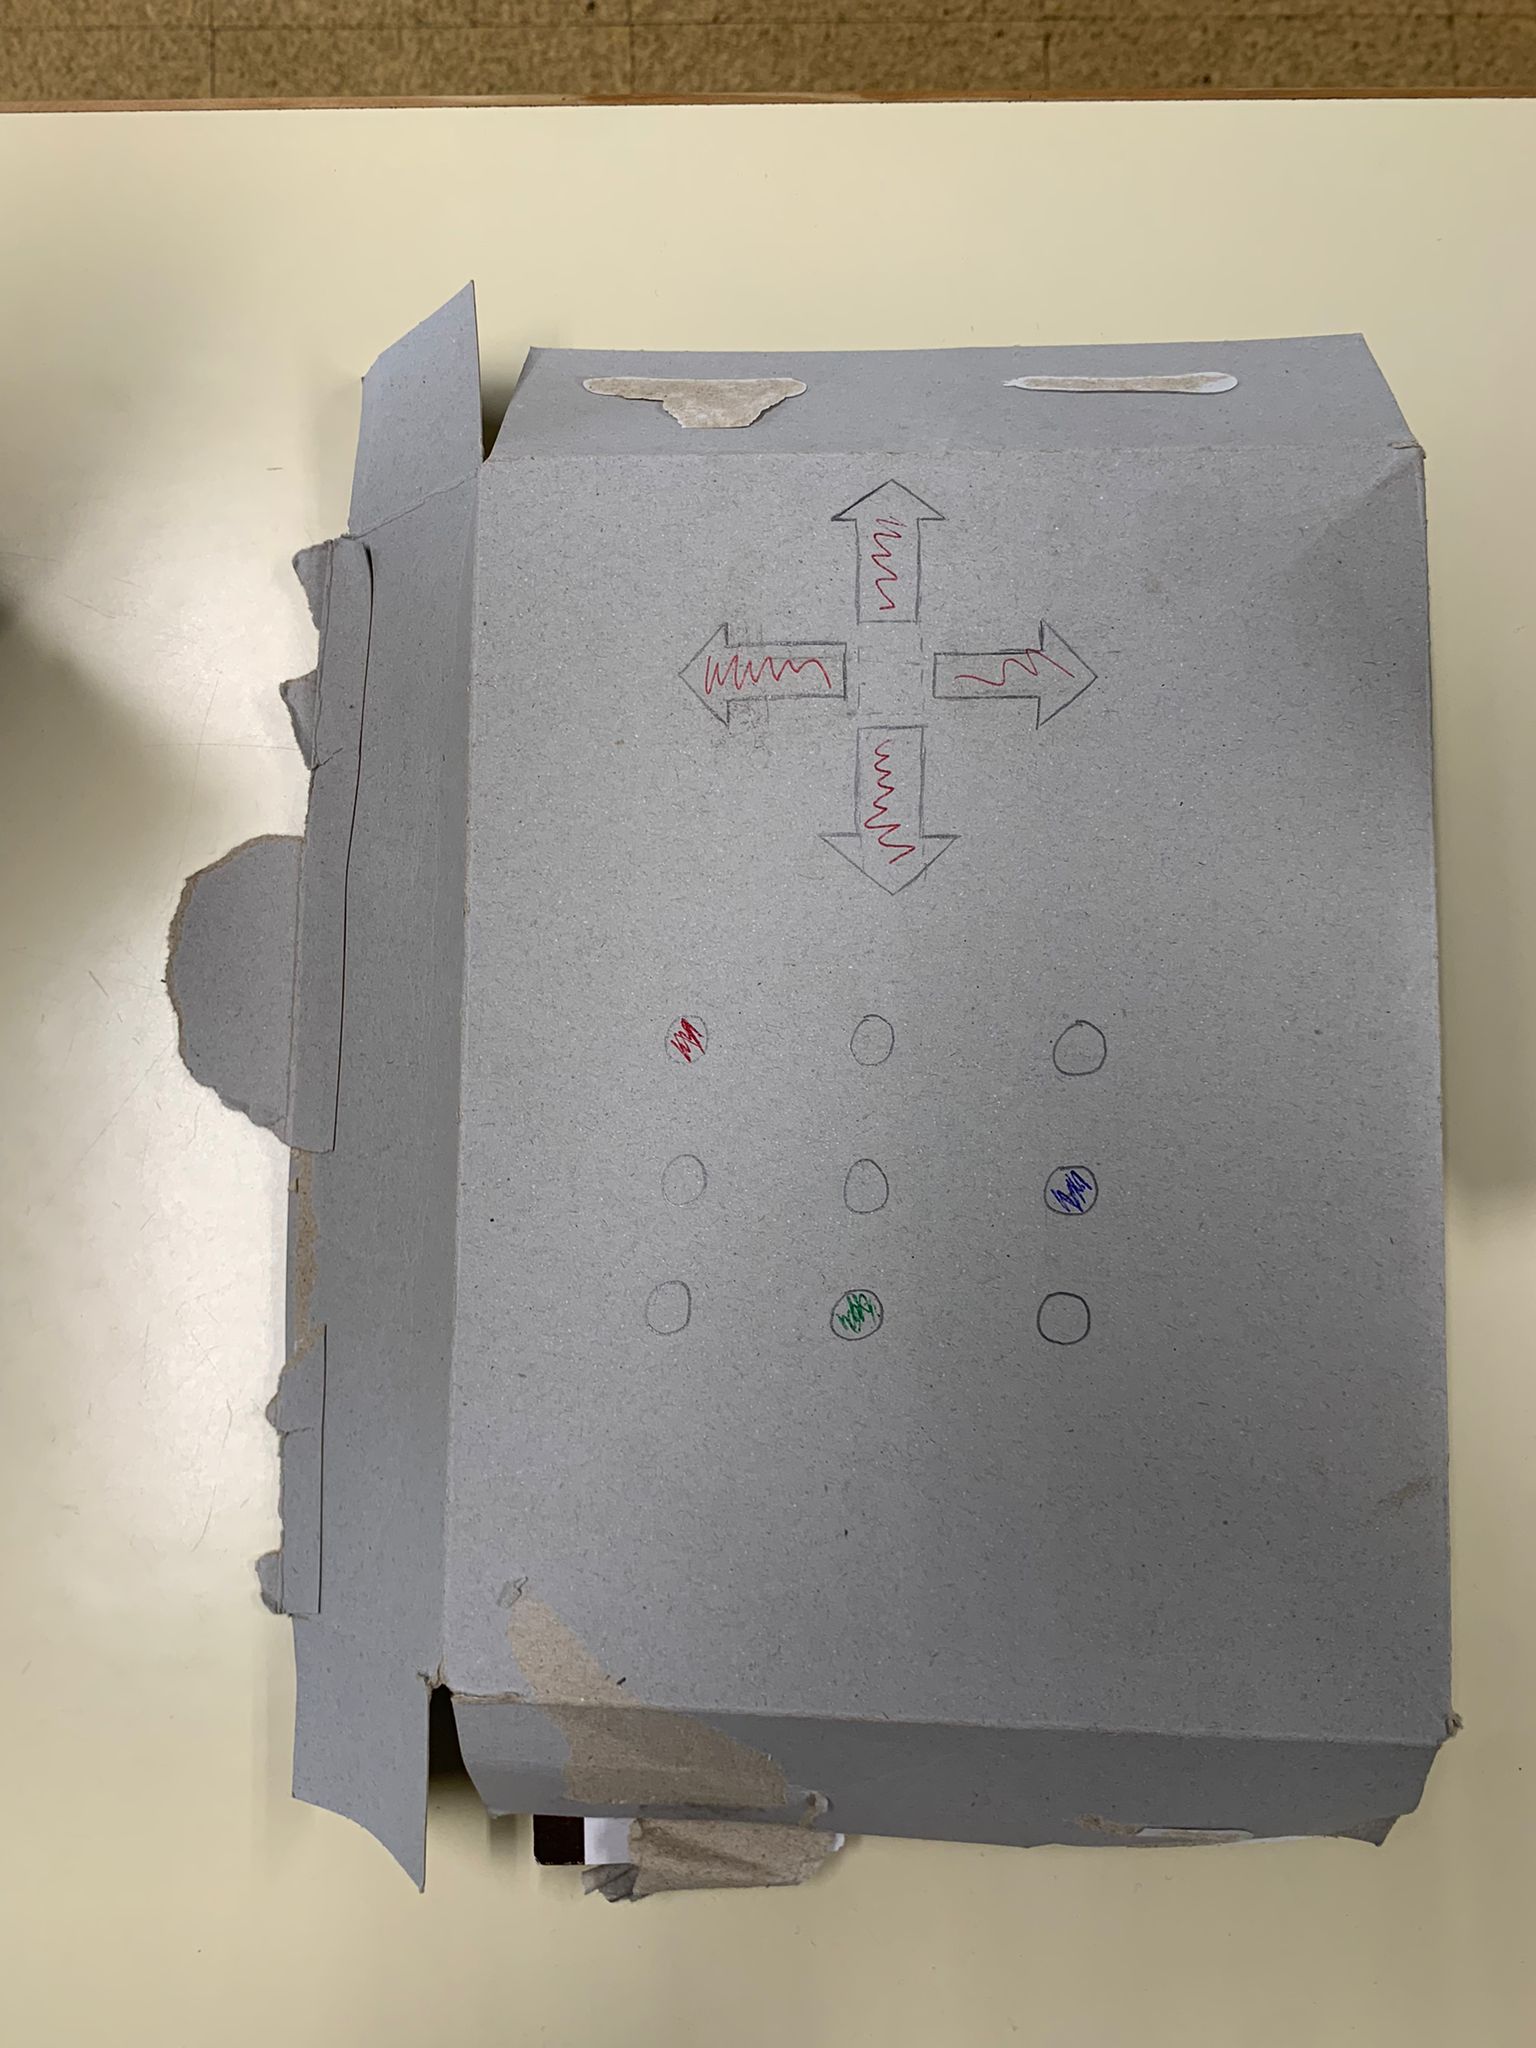
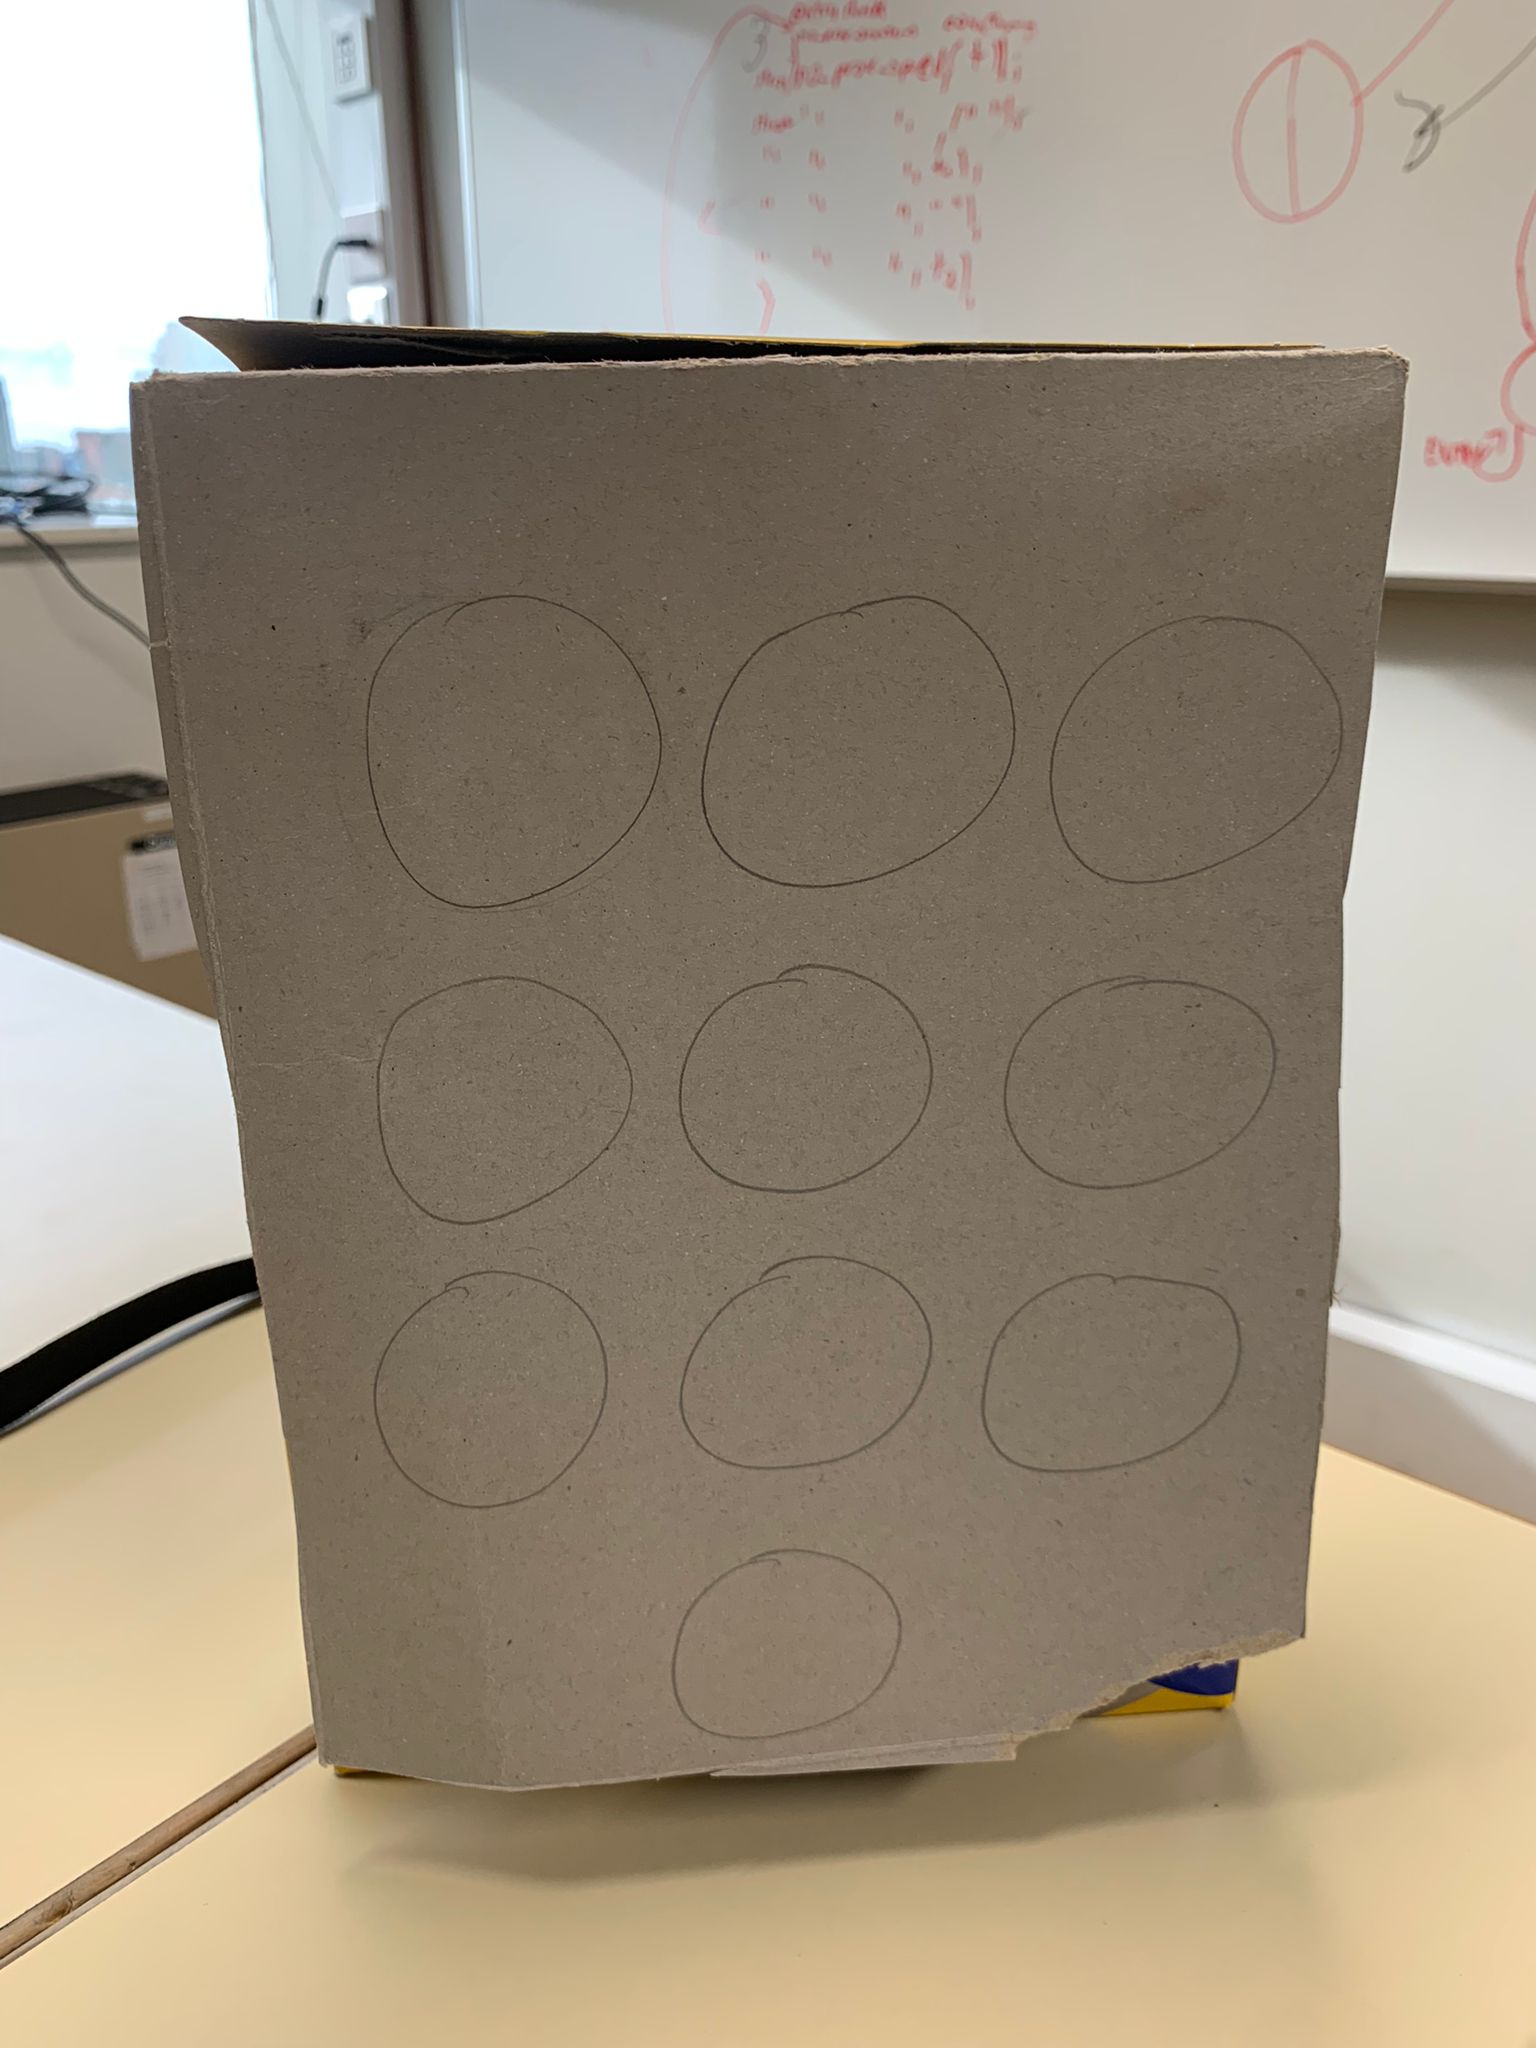
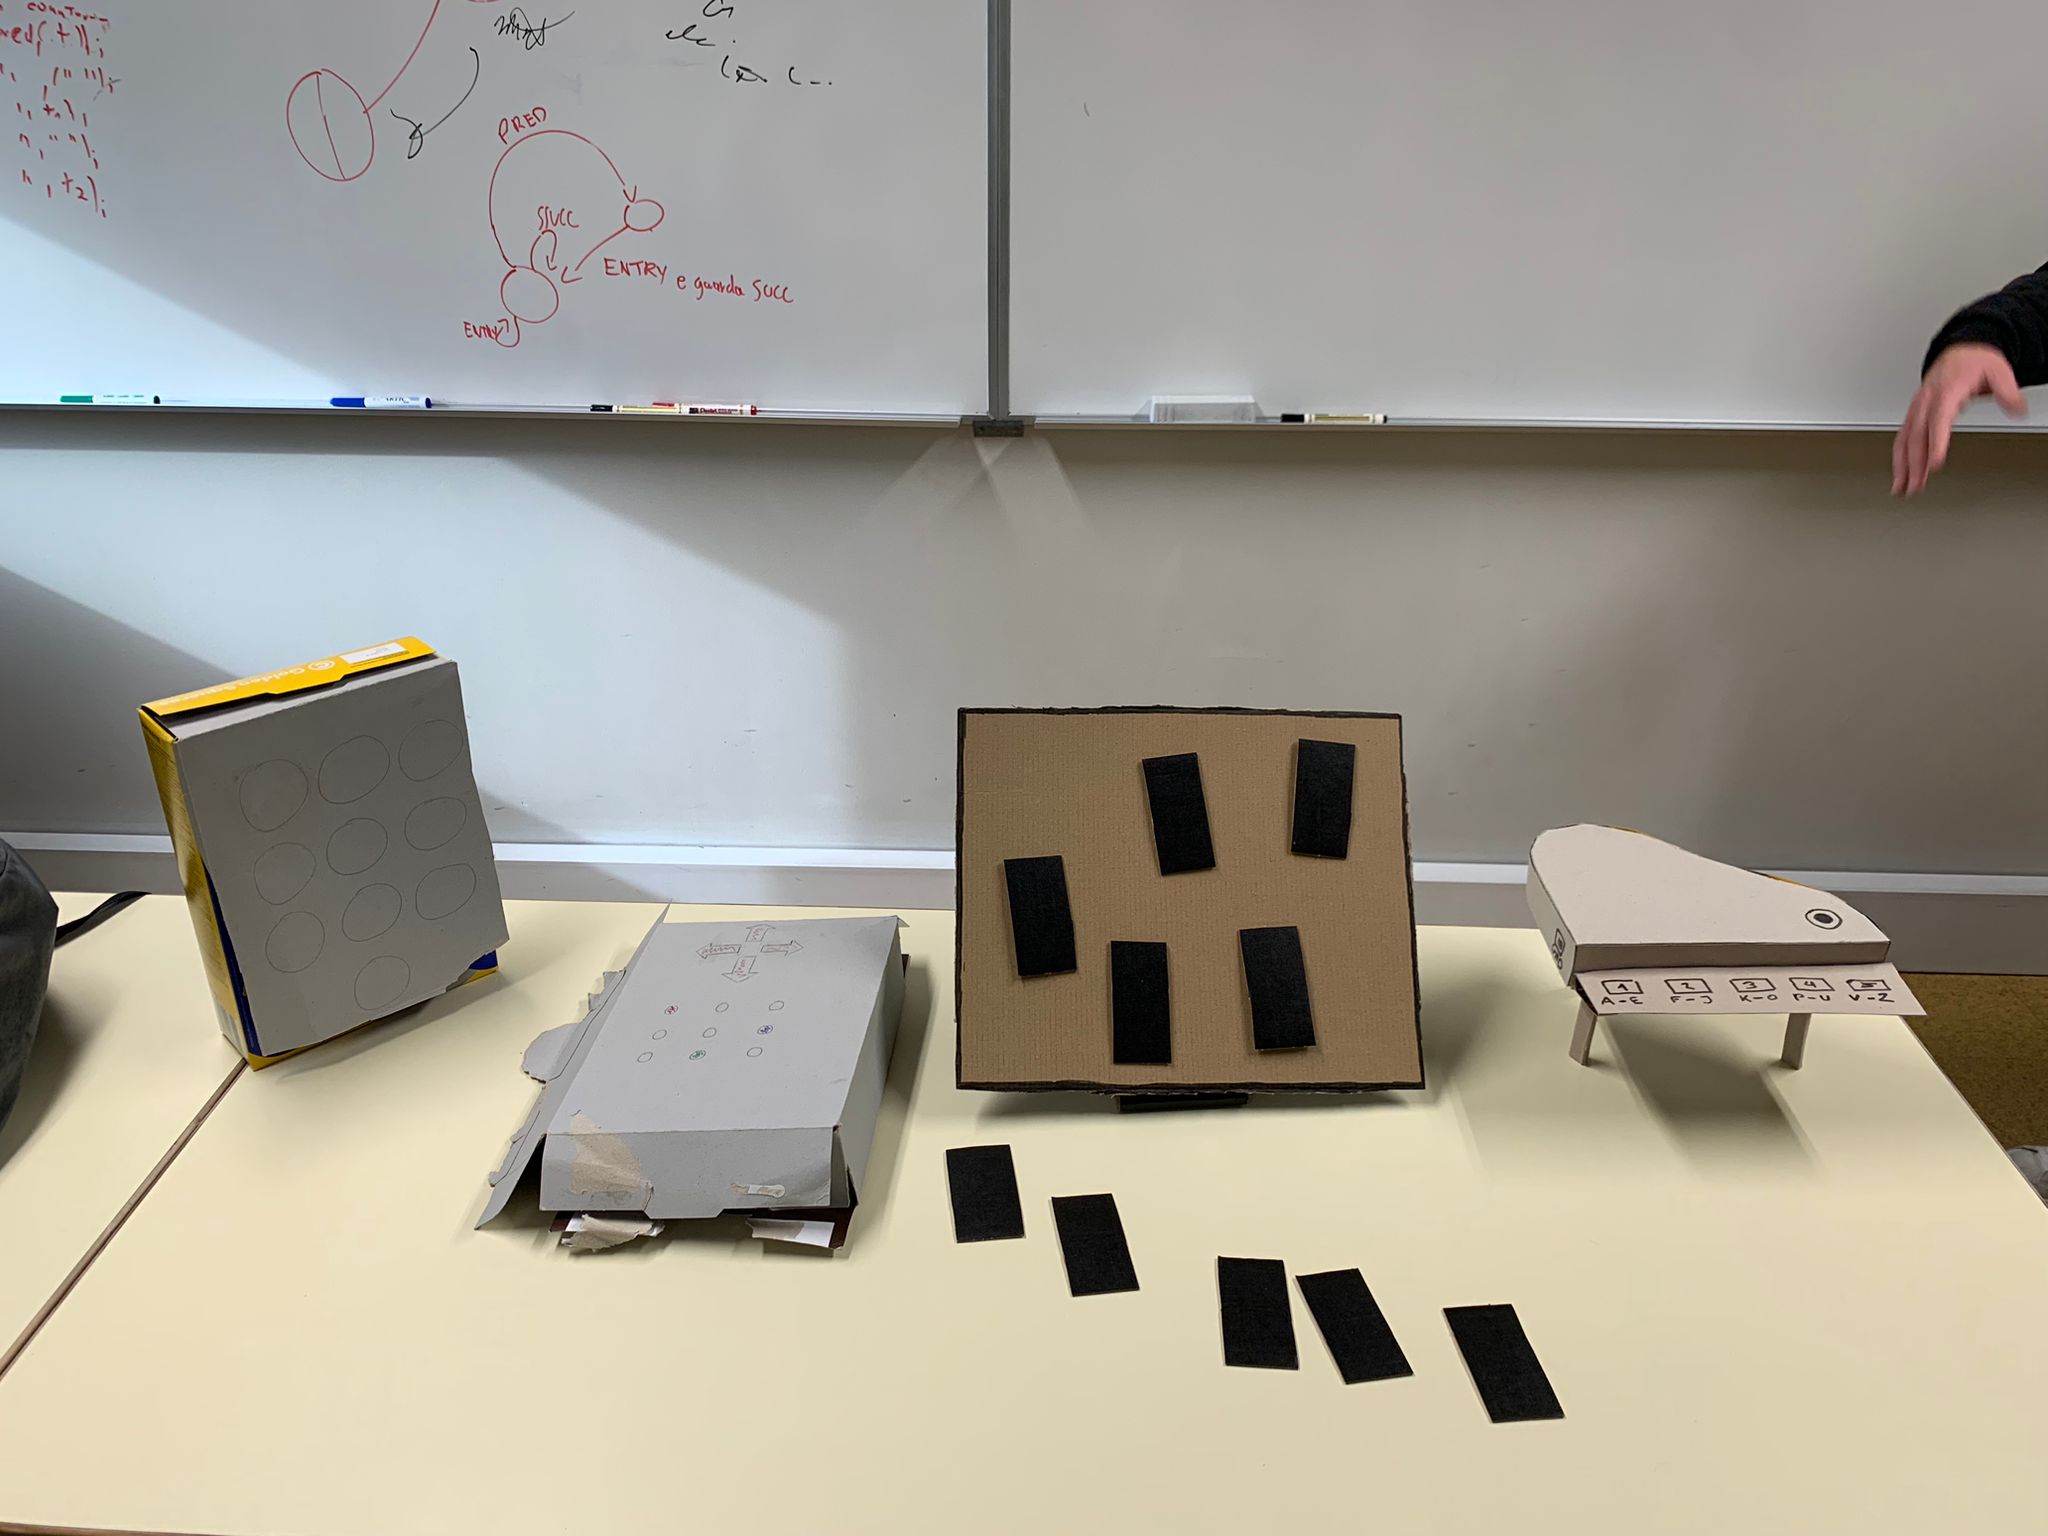
The hardware lead and the team leader built the prototype of the logic gates game in cardboard.[Gonçalo Firme, Rafael Santos]
The marketing manager made improvements to the pitch deck based on feedback received from Professor
Teresa Vazão and Assistant Professor Ricardo Santos.[Rodrigo Campos]
Next week, we aim to have the prototypes of the keypad, piano, and radio finished so we can start
testing.
This week started with identifying problems in the previously made hardware solutions and 3D models.
After identifying the problems, the design manager made the necessary changes to the 3D models
according to the feedback received from the entire team.[Gil Jardim]
Meanwhile, the builder manager and the hardware lead collected the missing materials needed for the
progress of the final prototypes.With the materials in hand, they created the final circuit
diagrams, determining where each component will be placed and where the cables will run.[Tiago Nóbrega, Gonçalo Firme]
After the diagrams were completed, the hardware lead and the team leader identified a voltage
problem with the power supply: for the Arduino MKR1010, the power supply cannot be 9V.[Gonçalo Firme, Rafael Santos]
The team leader started writing the escape room story.[Rafael Santos]
The marketing manager continued working on the final pitch deck.[Rodrigo
Campos]
On Friday (17/05), the design manager, the builder manager, and the hardware lead went to TagusPark,
where they began assembling the final prototypes. [Gil Jardim,Tiago
Nóbrega, Gonçalo Firme]
For next week, we hope to have the prototypes 3D printed, so we can have the final product as
soon as possible.
This week was essentially used to continue the work done during the last two weeks.
The software lead and the hardware lead continued the development of the Arduino code.[Gonçalo Baião, Gonçalo Firme]
The Design manager continued to develop the 3D models of the puzzle boxes.[Gil
Jardim]
After the arrival of the new components, the builder manager and the hardware lead attempted to
assemble the radio hardware. Tests conducted: Trying to get the Arduino to receive values from the
potentiometer while displaying these values on the screen, and reproducing audio.[Tiago Nóbrega, Gonçalo Firme]
The marketing manager continued to work on the Pitch Deck for the demo day and started to create the
project's promotional poster.[Rodrigo Campos]
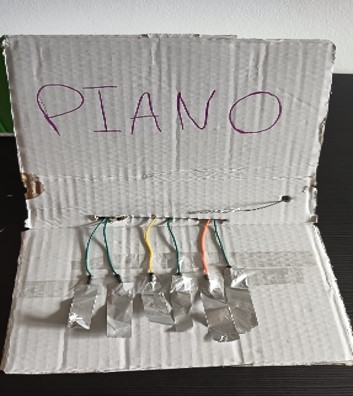
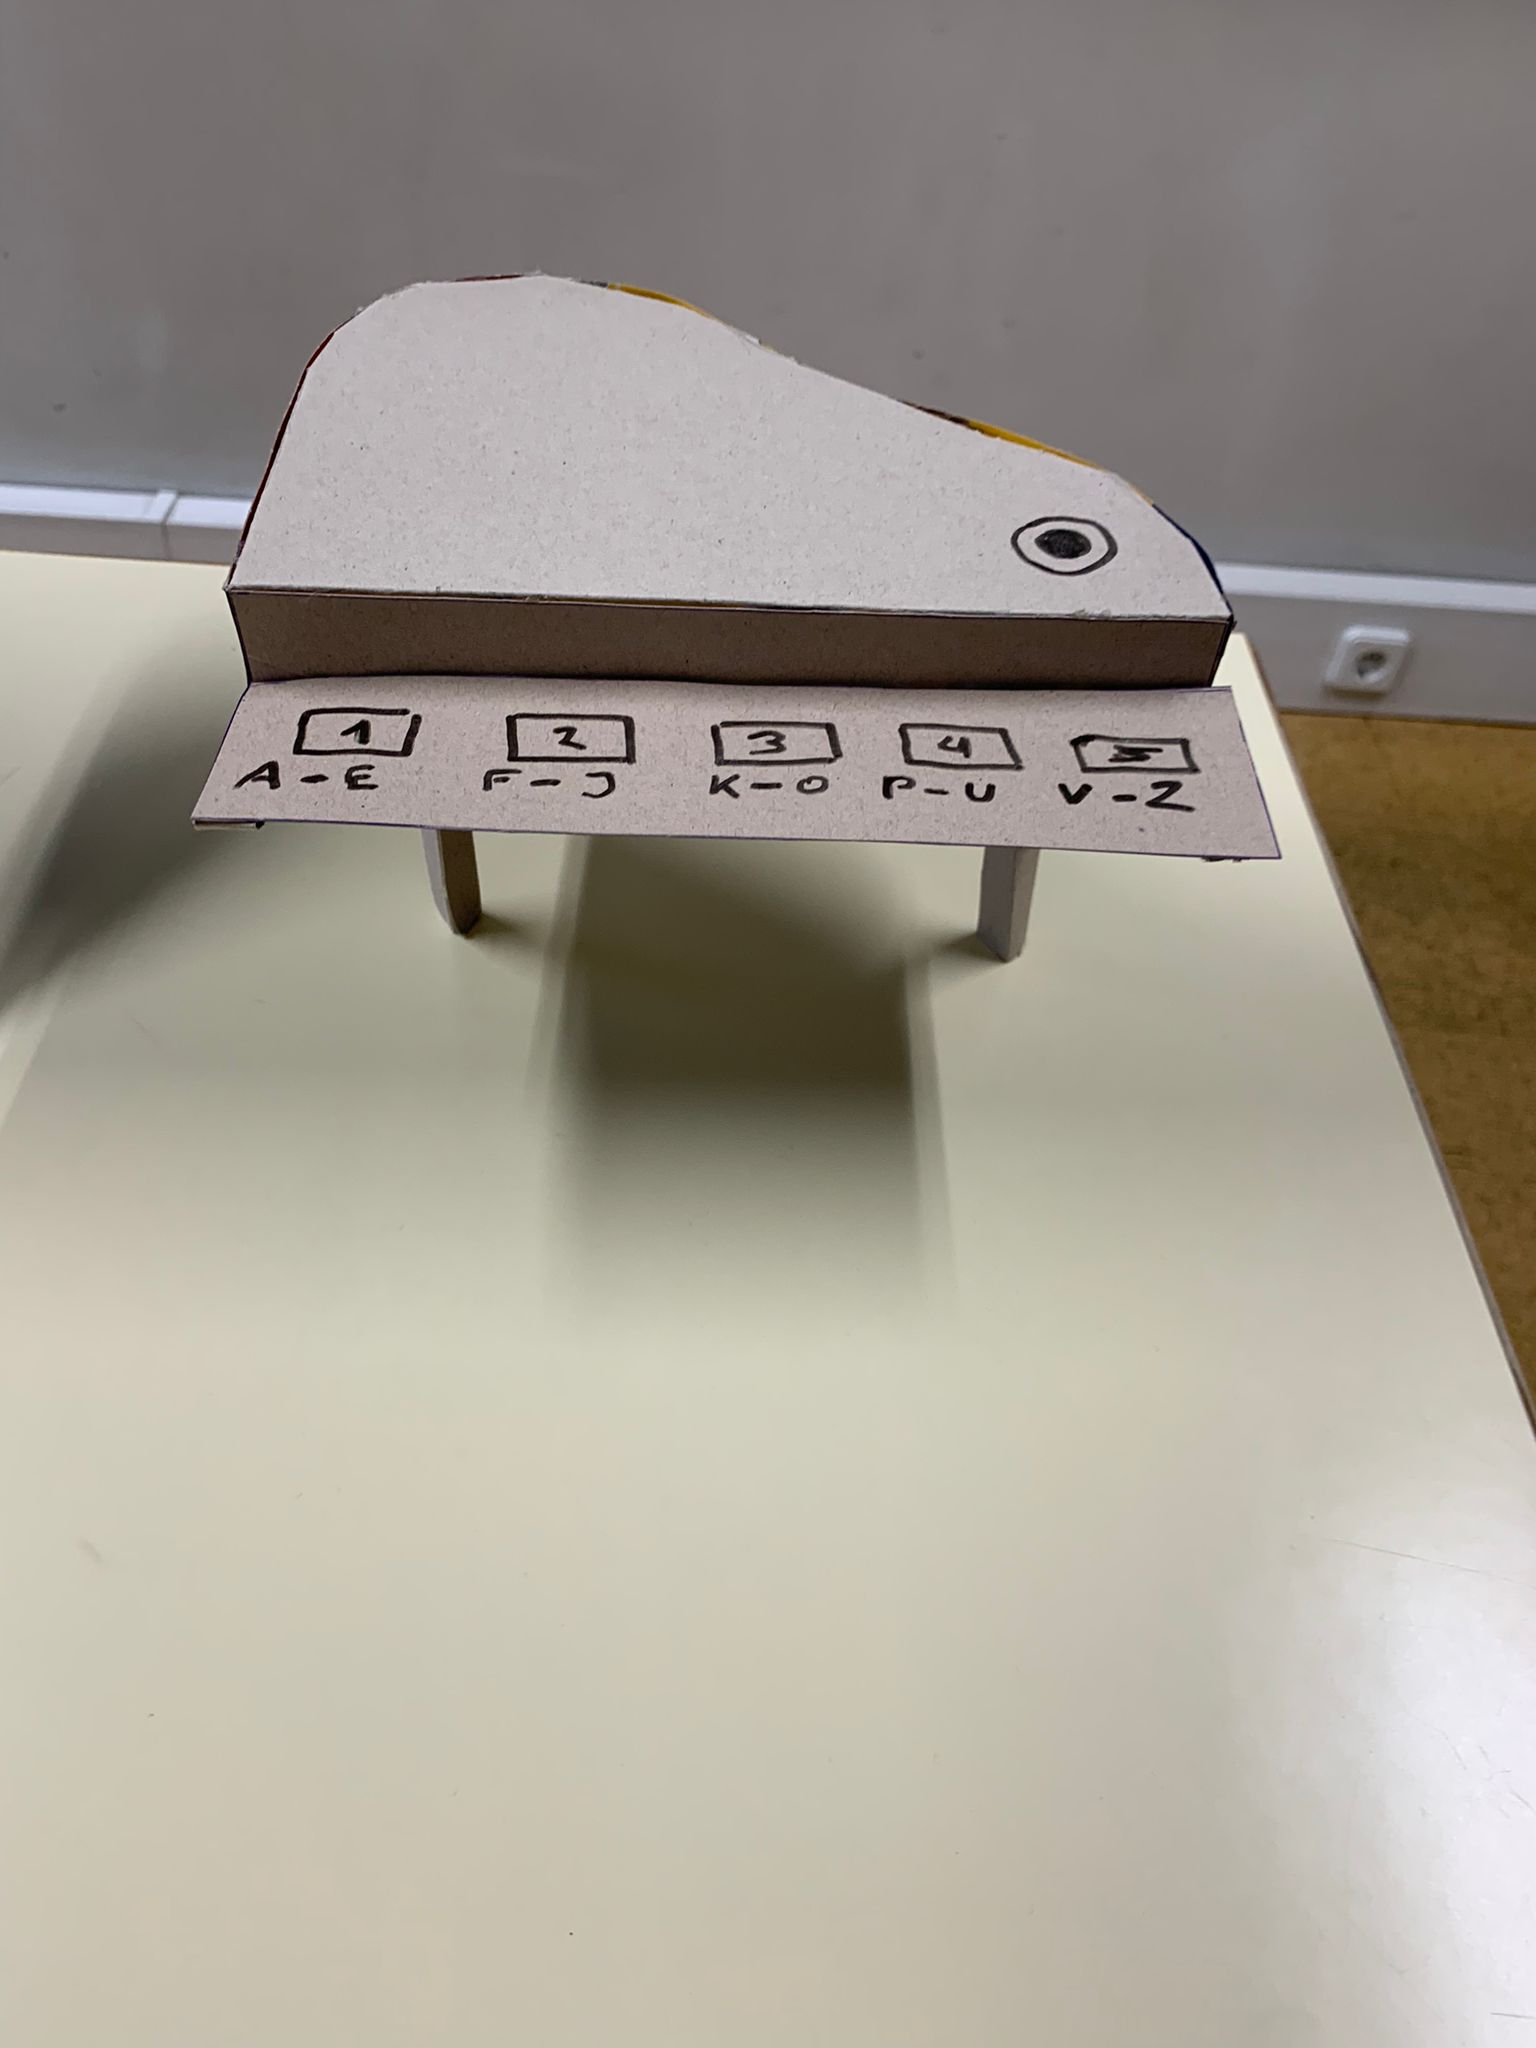
The builder, the hardware lead, and the team leader met to create the final prototype of the piano,
now in wood.[Tiago Nóbrega, Gonçalo Firme, Rafael Santos]
This week was primarily dedicated to completing the work started the previous week. The software
lead continued developing the interface to program the dynamics of the escape room using
Node-RED.[Gonçalo Baião]
The hardware lead continued developing the game codes and interactions with the other puzzles[Gonçalo Firme]
The team leader continued working on creating the storyline for the escape room.[Rafael Santos]
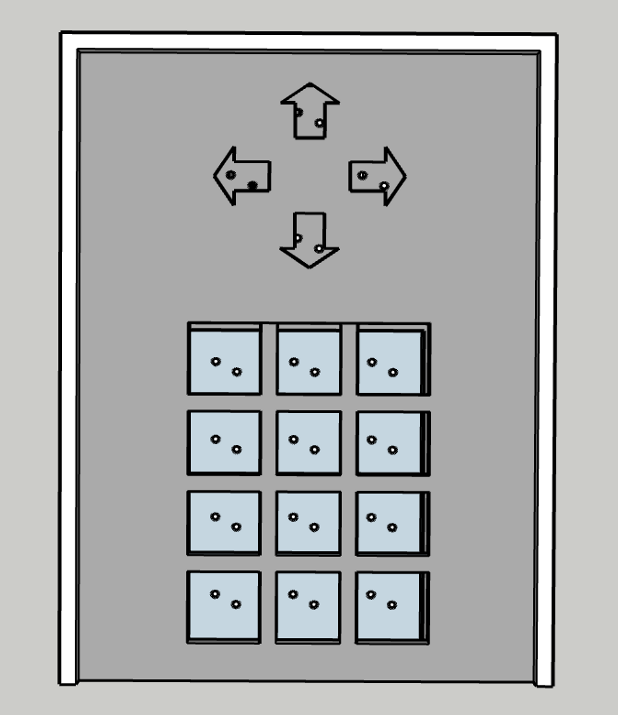
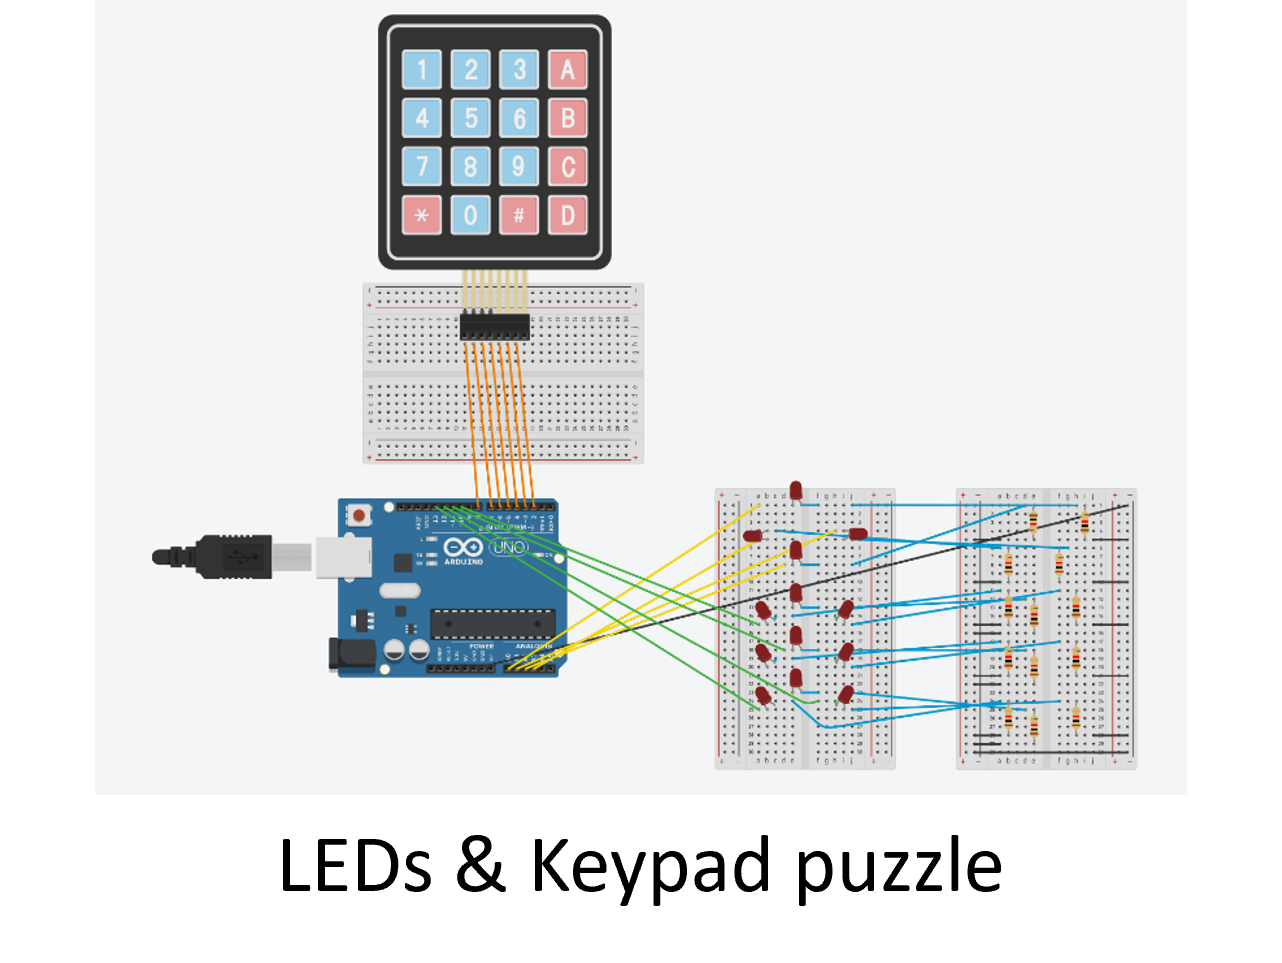
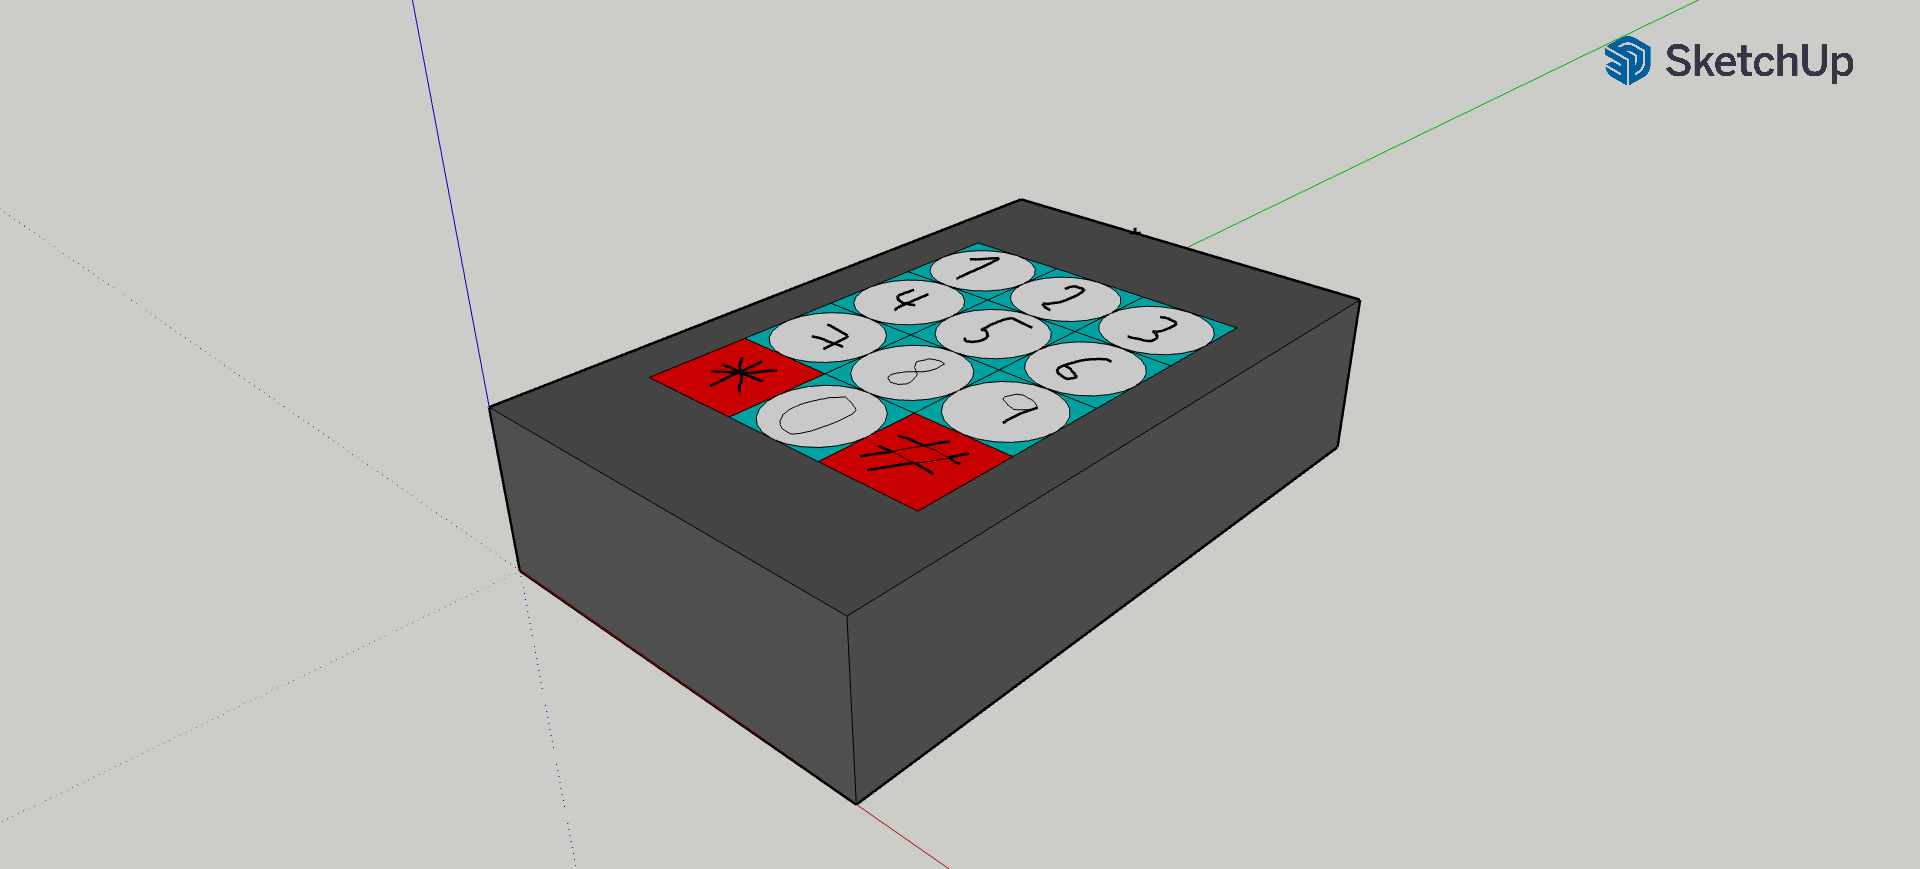
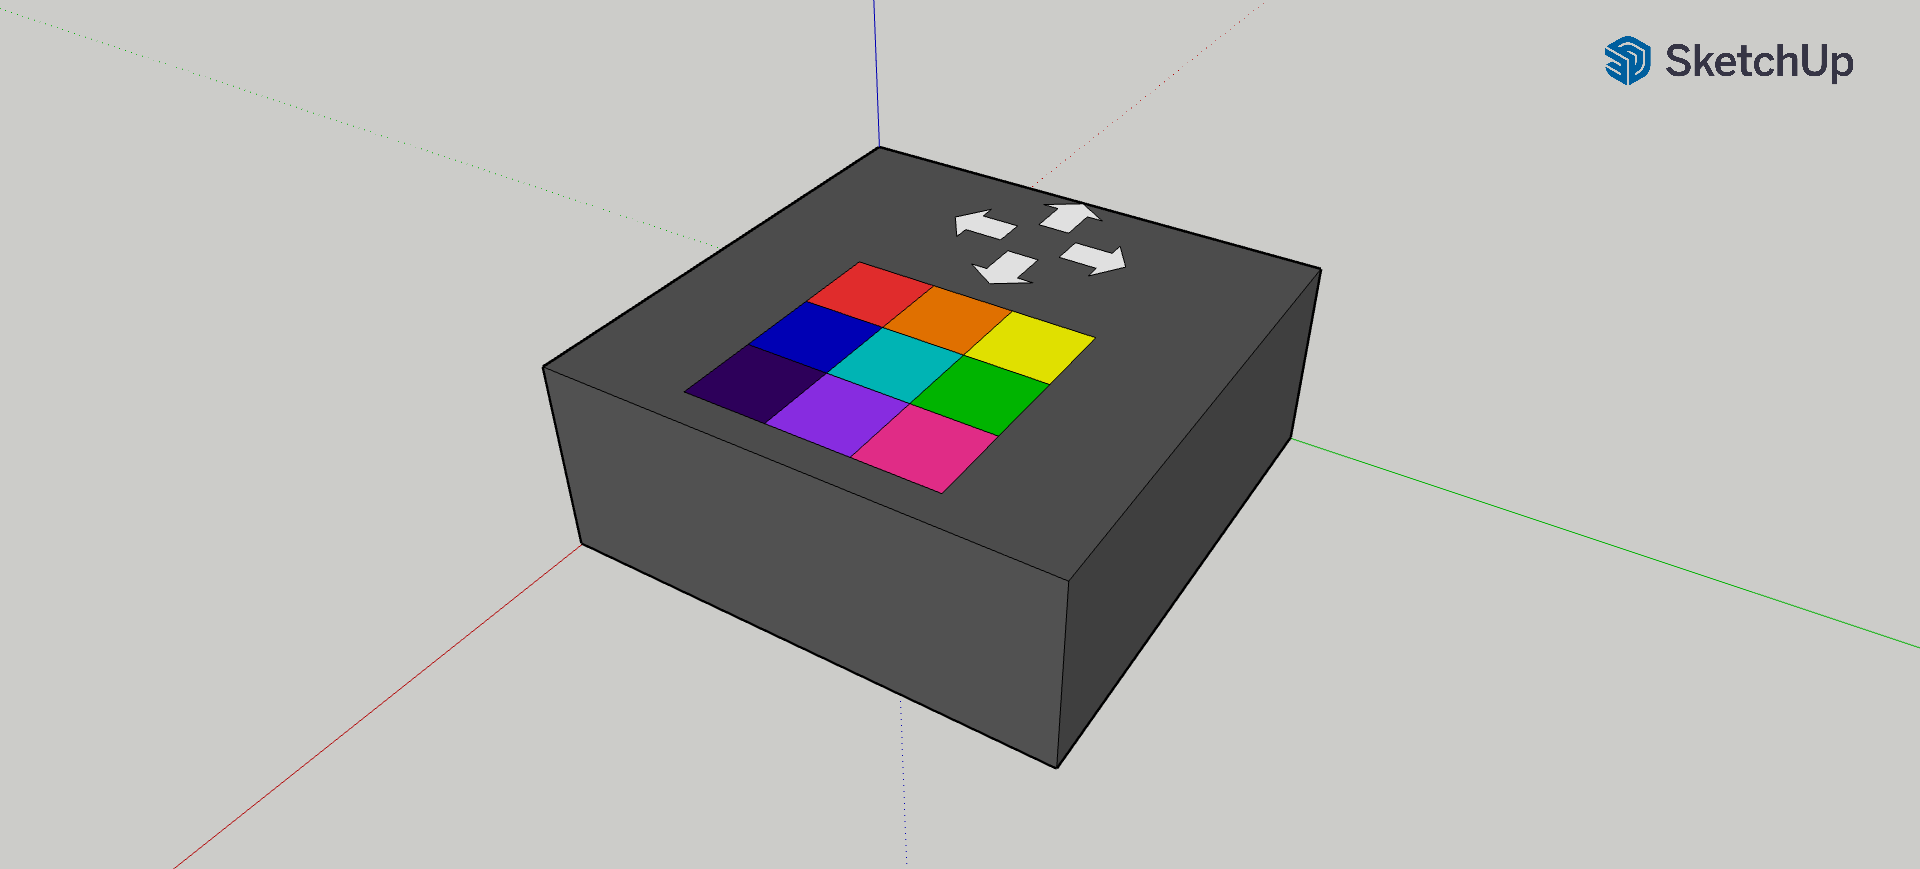
The design manager finalized the 3D model of the games for the LEDs and began developing the 3D
model of the "keyboard" and "logic gates" puzzles.[Gil Jardim]
The builder manager created a 1:1 scale prototype of the piano using cardboard.[Tiago Nóbrega]
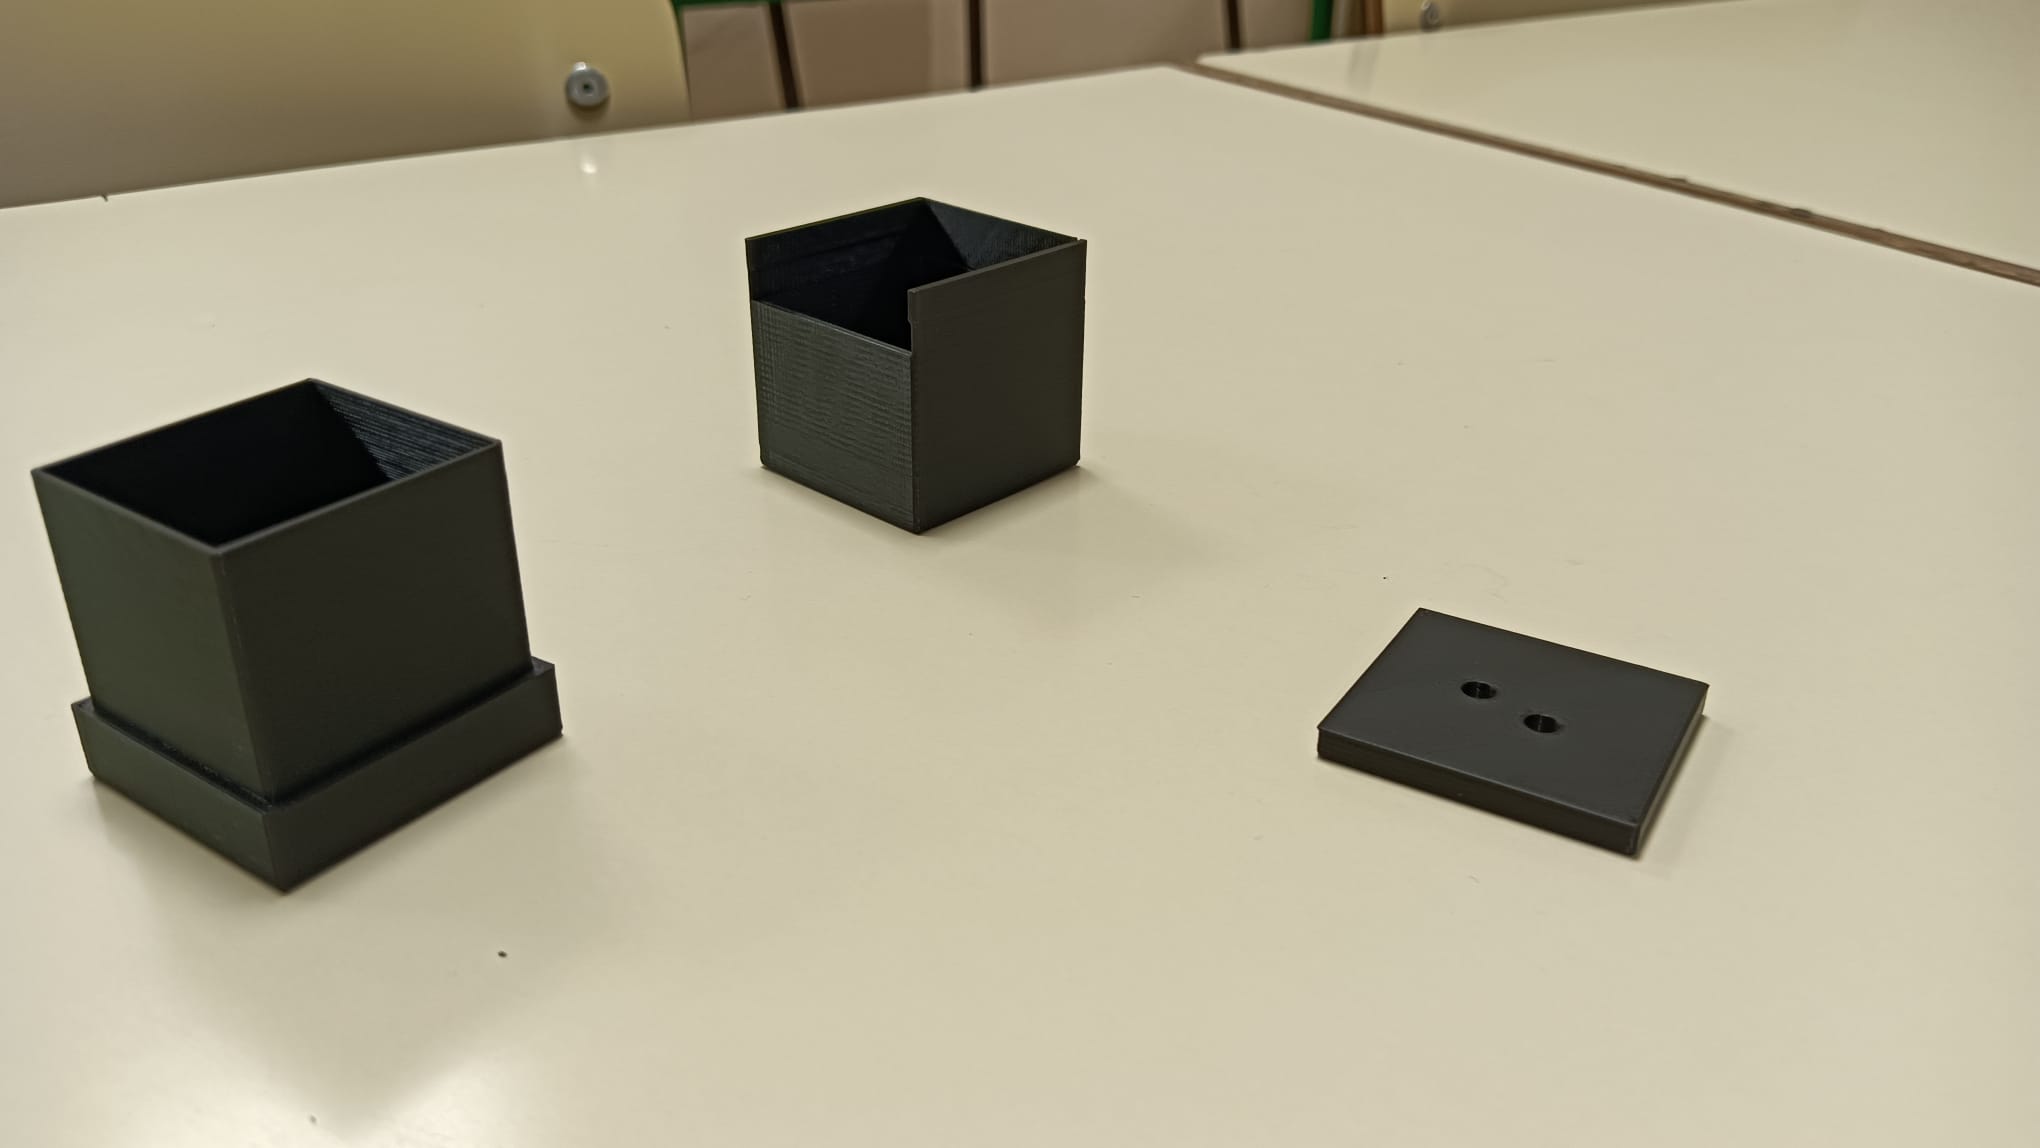
The builder manager, design manager, and marketing manager went to IStartLab to carry out the first
3D printing, in order to understand how to fit the boxes together and identify any missing details
in the 3D molds.[Tiago Nóbrega, Gil Jardim,Rodrigo Campos]
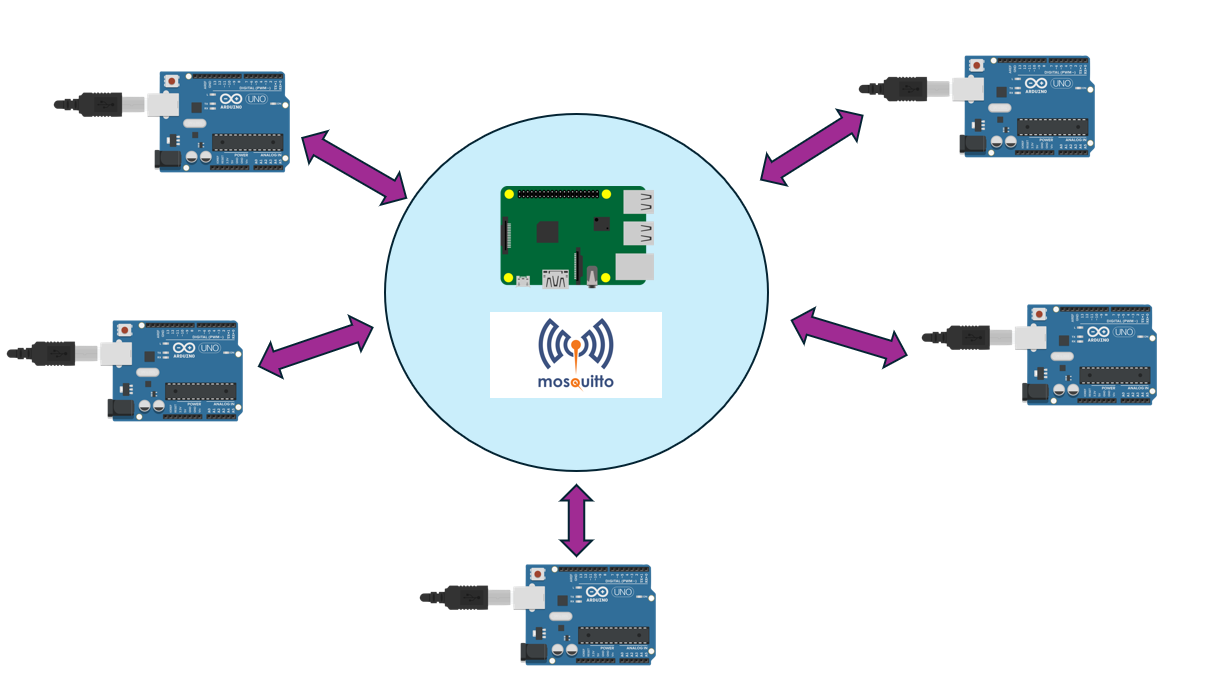
In order to have a network of Arduinos with an Raspberry PI 5 as an central
command unity they need to be able to send and recive messages.
This communication is essential for the project because it is vital for the different mini-games
to communicate with each other in order to make the escape room sequential and dynamic.
MQTT: The Standard for IoT Messaging
In the world of IoT, where devices collaborate seamlessly, MQTT serves as the backbone of
communication. This OASIS standard messaging protocol offers a lightweight, publish/subscribe
approach, reducing overhead and conserving resources. Devices subscribe to relevant topics,
receiving messages only when needed, fostering efficient communication.
Eclipse Mosquitto
Eclipse Mosquitto, an open-source message broker, is the cornerstone of MQTT protocol
implementation. With support for versions 5.0, 3.1.1, and 3.1, Mosquitto offers lightweight
efficiency, making it adaptable for diverse devices, from low-power single board computers to robust
servers.
Network representation:
Steps
The first step to make this communication possible was to install the MQTT Mosquitto on the
Raspberry PI 5.
sudo apt install -y mosquitto mosquitto-clients
Second step was to create an Hotspot with an static IP Address on the Raspberry PI 5.
Then the Arduinos were programmed to connect to the Hotspot and to subscribe and also publish on
topics of the MQTT using ArduinoMqttClient and WiFiNINA librarys.
Some of the functions used:
                            WiFiClient wifiClient
                            - Initializes a Wi-Fi client for communication.


                            MqttClient mqttClient(wifiClient)
                            - Establishes a connection between the Wi-Fi client and the MQTT client.


                            WiFi.begin(ssid, pass)
                            - Initiates a connection to the Wi-Fi network (in this case the Raspberry Hotspot).


                            mqttClient.connect(broker, port)
                            - Connects to the specified MQTT broker and port.


                            mqttClient.poll()
                            - Maintains the MQTT connection, typically called within the loop() function.


                            mqttClient.beginMessage(topic)
                            - Prepares a new message to be published to the specified topic.


                            mqttClient.print(content)
                            - Appends content to the message being prepared for publishing.


                            mqttClient.endMessage()
                            - Sends the prepared message to the MQTT broker for publishing.


                            mqttClient.subscribe(topic)
                            - Subscribes to the specified topic for receiving messages.


                            mqttClient.available()
                            - Checks if there are any available messages from the subscribed topic.


                            mqttClient.read()
                            - Reads and retrieves incoming messages from the subscribed topic.
With the communications working the next step is to make an interface so it's easier to
interconnect and change the interactions without the need to change and upload the Arduino code.
Also the interface is needed so it displays the Time left to Escape the Room and with the clues.
With that objective and after some research and tests Node-RED was choosen.
Node-RED
Node-RED revolutionizes the integration of hardware devices, APIs, and online services with its
intuitive programming tool. Featuring a browser-based editor, it empowers users to effortlessly
connect flows using a diverse range of nodes from the palette. With a single-click deployment to its
runtime, Node-RED simplifies the process of wiring together components, enabling the creation of
innovative solutions that leverage the full potential of connected technologies.
This week there was progress both in software and hardware development, as well as
in preparation for project promotion and information.
The software lead completed the research started last week on the best way to communicate between
Arduinos. For this, the method MQTT Mosquitto on Raspberry Pi 5, along with the programming tool
Node-RED, was chosen. The implementation is described in the TechPost. [Gonçalo
Baião]
At the same time, the builder manager and the team leader made some changes to the google forms.
[Tiago Nóbrega, Rafael Santos]
The designer manager completed the 3D model of the first prototype to be printed, for the "LEDs"
puzzle, and started the 3D models of the "Logic Gates" and "Keyboard" puzzles. [Gil Jardim]
The builder manager designed the electrical scheme for the "Radio" puzzle, but encountered the
problem that the Arduinos do not have enough memory to store MP3 files. Solution found: Encode the
MP3 files into an array of numbers using the "PCM.h" library. [Tiago
Nóbrega]
The marketing manager started working on the final pitch deck for the project. [Rodrigo Campos]
The hardware lead and the team leader created some stories for the escape room. [Gonçalo Firme, Rafael Santos]
On Tuesday (23/04), the team went to TagusPark to visit the room where the escape room could be set
up.
On Thursday (25/04), the team met and discussed the following topics:
● The software lead presented to the team how the communication between the puzzles would be
done.
● The team suggested some changes to the measurements and details of the 3D models made by the
designer manager.
After the meeting:
The hardware lead researched and gathered more information about the programming tool Node-RED and
the communication between Arduinos. Together with the software lead, they started defining the
communication protocol. [Gonçalo Firme, Gonçalo Baião]
The software lead started communication tests by sending messages between 2 Arduinos. The test was
successful.
The builder manager defined the final measurements for the "Piano" puzzle.[Tiago Nóbrega]
The designer manager made adjustments to the 3D models based on the feedback received. [Gil Jardim]
The team leader started making flowcharts of the previously created stories.
[Rafael Santos]
The marketing manager started testing the AutoCAD software so that we can use this software in 3D
models, in order to obtain more detailed prototypes.[Rodrigo Campos]
On Monday, April 15th, the team gathered to plan the mid term presentation and
define the tasks for the week.
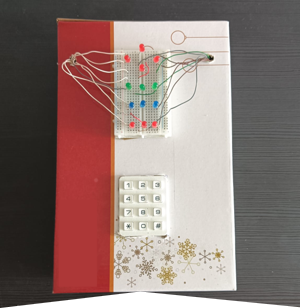
Throughout the week, the hardware lead and the team leader gathered opinions and feedback from
students at Técnico about the "keyboard + keypad" prototype, noting how long it took each person to
understand and solve the puzzle. [Gonçalo Firme, Rafael Santos]
The feedback we received indicated that people were taking too long to understand the game, so we
made some changes to the prototype to make it easier to comprehend. [Gonçalo
Firme, Rafael Santos]
The hardware lead, with the help of the team leader, created the prototype for the logic gates.
[Gonçalo Firme, Rafael Santos]
Meanwhile, the builder and the
marketing lead developed the prototype for the piano, to be presented to the professors. [Tiago Nóbrega, Rodrigo Campos]
Simultaneously, the software lead started working on the communications between Arduinos using the
Raspberry Pi 5 as a Wi-Fi access point.
The initial test involved hosting a web server on the MKR 1010. [Gonçalo Baião]
On Thursday, April 18th, we had our mid term presentation, where we were able to showcase our
prototypes and our plans for the future of the project, receiving feedback from the professors.
After the presentation, the team gathered again to organize the next steps, based on the feedback
received.
The builder started creating the google forms, which will soon be available on the website.[Tiago Nóbrega]
The team leader revised the list of materials to
send to the professors.[Rafael Santos]
The software lead made
some visual improvements to the website.[Gonçalo Baião]
The designer began creating new 3D molds, considering the placement of each component, such as where
to place the Arduino batteries, whether the box needs to be opened to connect the battery, or if it
will have an on/off button. [Gil Jardim]
After 8 weeks since the website was published, we received valuable feedback from
both teachers and other visitors, about what was working well and what could be improved.
Therefore, during this interval between the 3rd and 4th periods, the software responsible made
significant changes to the website structure to address the feedback received. One of the main
changes was to the landing page of the site, creating an environment that immediately captures the
visitor's interest.
The texts and their layout were carefully revised throughout the site to make reading simpler and
more engaging for all users.
Additionally, the website's logo underwent a redesign to better align with our updated aesthetic.
We are excited to unveil the new look of our site and look forward to receiving feedback from
visitors. Be sure to let us know what you think at the end of the page!
The team had a very productive start to the week, with the hardware developer
obtaining the necessary material for the project, something that was previously unavailable. With
this new material in hand, it was possible to make progress in developing the new games, aligned
with the storyline defined for the escape room.
During the week, the marketing manager asked each team member individually for feedback on the
project , such as any problems encountered and results achieved. In order to prepare the PowerPoint
for the mid presentation.
On Tuesday (2/04), the team leader, the builder, the designer and the software developer gathered
with the aim of testing the circuits and replicating the 3D molds in cardboard, in preparation for
the interim presentation. During this meeting, the following results were achieved:
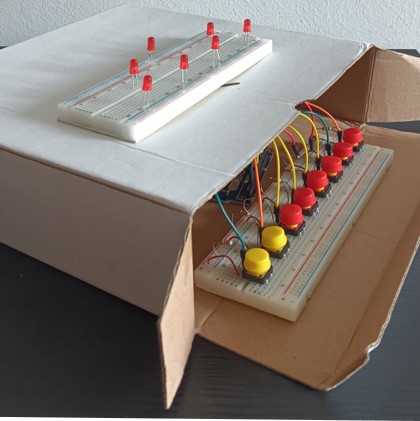
- The prototype of the LED's + Keyboard is 90% assembled, with only the task of hiding some cables
remaining.
- The Protoype for the Piano puzzle has been assembled and is functional.
- The hardware for the Logic Gates puzzle has been assembled and successfully tested for the first
time.
These results demonstrate significant progress in the project's development. The next step will be
to finalize the remaining details of the LED's + Keyboard prototype and continue refining the other
elements of the game. With these advancements, the team is getting closer to successfully completing
the project.
weekly meeting and creation of storyline, clues and mini games! [Click to read
more]
Posted on March 30, 2024
This week, we have made limited progress due to the overload of schedules from
other disciplines.
On Wednesday, March 27th, the team gathered to develop an escape room concept from scratch,
including the storyline, clues, and the mini games interaction sequence. Following this session, we
met with assistant professor Ricardo Santos for our weekly meeting. During this meeting, we
presented our first escape room project and received positive feedback, to proceed with its
development.
On Saturday, March 30th, the team came together to prepare the PowerPoint presentation for the
upcoming mid-term presentation, scheduled for the 1st week of April.
This week the group divided into 3 groups of 2, where each group had the objective
of making the electrical diagram, and the Arduino code for a mini interaction, using the available
material. To do this, we learned how to use Arduino IDE and used different Arduino simulation sites,
like Tinkercad, for instance.
On Tuesday (19/03) the team met, and at the meeting, each group presented their mini interaction,
and gave their feedback on ideas or difficulties encountered in the process of building it. After
the interaction presentations, each group built the next group's game, so this way, the entire team
gets to be involved in all games. At the end of the meeting the group tried to combine the 3
interactions previously created and this was the result.
On Wednesday (20/03) we met with assistant professor Ricardo Santos, where he gave us his feedback
on the mini games we made, and suggested for the team to establish a whole set of interactions,
alongside its clues and story for next week.
This week, we started by designing the first 3D models of the mini games that'll
be made through 3D printing.
Wednesday (13/03) we held our weekly meeting with the teachers, in which we discussed about the 3D
models, and brainstormed about some changes that could be made. Also we had our first contact with
some of the material requested.
After the meeting, the group began to test and experiment on some of the new components, trying to
assemble simple circuits, in order to get familiar with the hardware.
weekly meeting and construction of game models! [Click to read more]
Posted on March 08, 2024
This week started with the designing and building of each game prototype, followed
by its presentation to the professors. The mockups were mainly made of cardboard, but still gave us
an insight of the limitations that we might have when building the final product.
On Wednesday (6/03) the group attended a lecture on team work, where we learned about how to deal
with discrepancies in ideas and how to manage the schedules of all members, and the conflicts that
may eventually arise.
Finally, we ended the week rethinking on how to connect all of the escape room games, and how to
randomise these connections, from game to game.
weekly meeting, group organization and list of material! [Click to read more]
Posted on March 01, 2024
This week, we presented our mini game proposals at the weekly meeting with
Professor Teresa Vazão and assistant professor Ricardo Santos. After listening to the teacher's
points of view, the group came together and 3 groups of 2 were formed.
Each group will be
responsible for designing and building a game model, which must be ready for the next week.
A list of necessary materials was also sent, so that we could have a first contact with the hardware
as quickly as possible.
This week we had the first face-to-face meeting with professor Teresa Vazão and
assistant professor Ricardo Santos. In this reunion we were able to clarify some doubts
regarding the overall direction of the project. After the meeting with the teacher, the group met
and decided which puzzles to build, and a list was made with the materials needed.
Brainstorming and material sorting! [Click to read more]
Posted on February 19, 2024
To start off, team brainstorming allowed us to expand our horizons regarding
possible ideas for relevant puzzles. After selecting the most appealing puzzles, we represented them
by simple block diagrams and listed the materials needed for their construction.
Project proposal update.
Afterward, we updated our project proposal according to the revised suggestions from the professor.
The project proposal PDF can be downloaded from the landing page.
Website development and publication.
Finally, we developed the website containing the project's landing page, as well as information
about the team members and the blog which will contain weekly updates.The website was published with
the url http://web.tecnico.ulisboa.pt/ist1103318 at 14 february 2024.