DC Motor
For our portfolio class we had the opportunity to make a simple electric motor using only simple materials such as a wire, a magnet and a battery, with this experiment we learnt how forces of electricity and magnetism can work together and how they produce a magnetic force which makes the motor spin (in only one direction).
How to build a DC motor?
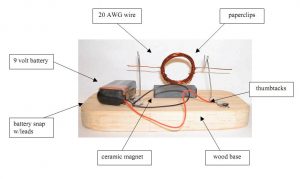
– What you will need:
- 20 AWG wire;
- Paperclips;
- Thumbtacks;
- Paper/wooden base;
- Ceramic magnet;
- Battery snap w/leads;
- 9 volt battery.
– How to make?
- Wind 20 AWG magnet wire around a small cylindrical object making 12-15 loops;
- Using a razor blade, strip only the top surface of the wire. Be sure not to strip the sides or the bottom, just the top all the way to the end of the straight section;
- Strip the other straight section of wire completely – top, bottom and sides;
- Prepare to assemble the motor;
- Place the ceramic magnet in the middle of the paper base;
- Bend two large paperclips and secure them to the base;
- . Place the rotor in the paperclip supports. When the loop of wire is oriented vertically, the plane of the loop should be directly over the magnet. Adjust the magnet and/or supports accordingly.
- Attach the battery snap to the battery.
- Touch the black lead from the battery snap to the thumbtack that is securing one of the paperclips.
- To complete the circuit, touch the red lead from the battery snap to the thumbtack securing the other paperclip.
- Give the rotor a little push:
a) If the rotor spins… Ta-dah! You have a working motor! b) If the rotor does not spin…try giving the rotor a nudge in the other direction.
Here is a video that explains and shows you step by step what you should do if you want to try out this project:
– Our motor:
Don’t forget to check the motor we built: